One of the trickiest parts of building your bar is getting everything cut and fitted as it needs to be, especially the bar rail. It may not be the ideal first time DIY project for woodworking, but it can be done even by patient first-timers. It really is important to read tips and instructions completely and then reread them again. Here are some tips on how to properly cut bar rail.
There are plenty of articles and resources out there to help make sense of this type of project. This also means there is no excuse to not get the fitting for your bar rail the way it needs to be. Use this along with other sources, and you should have no real trouble making your bar exactly how you want it.
For this type of project you will need a decent saw plus some other tools including a square, a slide ruler and similar tools. Also some basic math skills may be required.
Here are a few examples of compound miter settings for a bar rail and other things you need to know to complete your project:
- Say you want to miter a 45 degree angle for two equal angles 22.5 degrees, which would be appropriate for this. Basically you should be able to draw a perpendicular line from the front rail to the spot the 45 degree angle will end up. This is in relation to creating the wrap around corner for your bar.
- For proper cuts, one of the most useful tools you can apply is a jig. Fashion a jig so that you have it set up exactly how the bar rail will sit on the bar top. Basically using epoxy the miter can be glued together. However this may not be ideal if you are planning on bringing together two pieces that are very long.
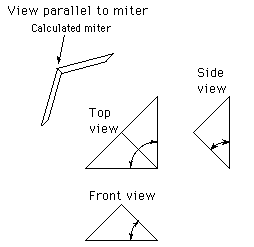
 If you need some help making sense of determining the miter cut between two planes, you can also use resources such as http://home.earthlink.net/~timcera/angle.html. Although you really only need basic math skills, if you haven’t used those math skills for a while you may be a bit rusty. It is a better idea to use resources to get the math right and, as always, double check your work before making any cuts.
- When in doubt cut some scrap first and see. It is a much better idea to practice your cuts and math on scraps instead of on the bar rail itself. Once you make a first few calculations and cuts, you will either find any potential mistakes or get more confident with your work. From there the rest of the work on your bar should be much easier.
 If you need some help making sense of determining the miter cut between two planes, you can also use resources such as
 When in doubt always do some checking before making potential mistakes. You will get much more confident working on your bar and any other wood projects you have. There are also plenty of other articles and resources to use to help move past cutting and fitting your bar rail to finishing up this project and getting ready to simply enjoy it.